

 Got-diagnosis
MELSOFT GT Works3
Professional designs. Maximized efficiency. Intuitive operations.
All made possible by GT Works3.
Support screen creation
GOT Graphic Ver.2 [NEW]
Screen design can be selected from various designs by theme. Simply select your favorite design from presets to change all screen backgrounds at once. You can keep screen design consistent across the entire project and reduce steps in the process. In addition, the screen design can be customized to create favorite design.
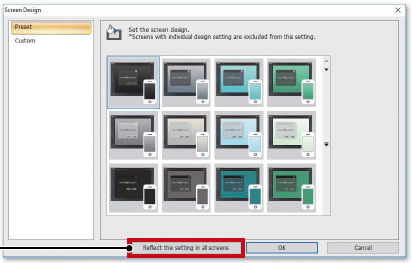
Pre-installed screen designs
Select one of the screen designs pre-installed in
GT Designer3. You can easily set a screen design without
paying attention to the setting items. Each screen can be
customized individually.
Change the design for all screens at once
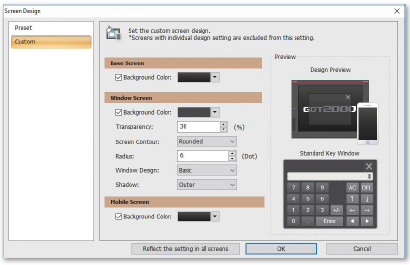
Customized screen designs
Customize a screen design. You can customize the background color, design of window screens, and other settings of a screen design selected from the preinstalled screen designs.
Both square and rounded contours are available for window screens. The radius can be adjusted for rounded contours.
Set your desired radius in one dot increments
The background color transparency can be changed in window screens. You can check and control the window screen while viewing the overall image of the base screen. Alarm popups turn transparent as well so that they do not block the base screen underneath.
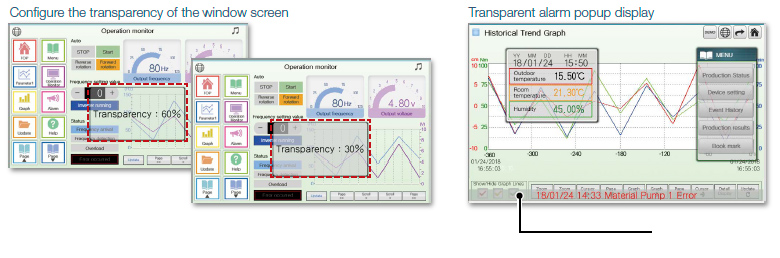
Alarm popup
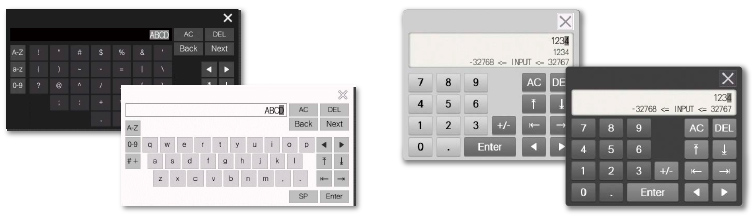
Multiple system key windows are available for your screen design. Select a preset that fits your screen design to use a matching numeric keypad. The key window is made transparent when moved so that you can check the screen underneath.
- * Not supported by GT21 and GS21.
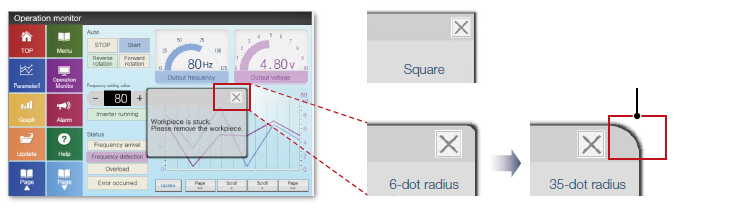
Antialiasing is available for figure contours in addition to on-screen text. Overall screen display is smoother for stress-free, stylish screen design.
Antialiasing enabled
Procedure: [Common] → [GOT Type Setting] → Graphics Setting [GOT Graphic Ver.2]
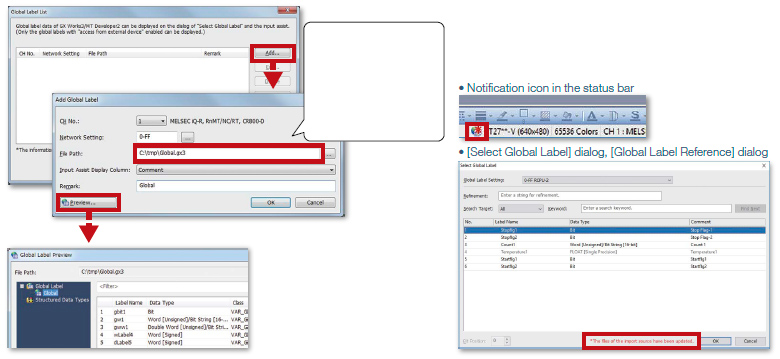
Label/Global label [Upgraded]
Instead of using devices, use label names to create easy-to-understand project data efficiently. Not only Mitsubishi Electric programmable controller devices, but also non-Mitsubishi Electric controller devices and GOT internal devices can be assigned to labels. Labels can be used in GT Works3. In addition, labels can be imported from GX Works3, GX Works2, and MT Developer2.
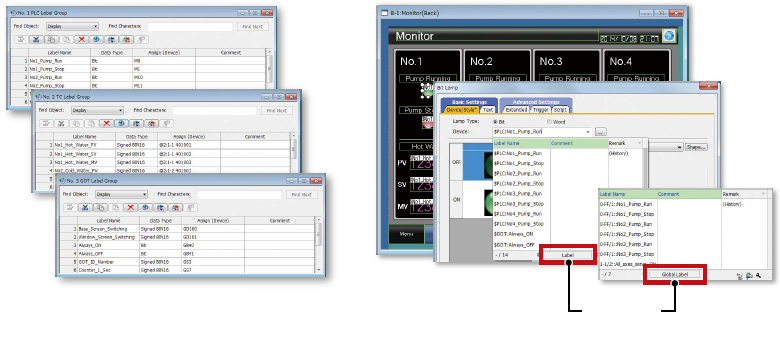
Select a type
➊ Set label names and assign devices
➋ Select a label name when setting objects
(Direct input is also possible.)
Procedure: [Common] → [Label] → [New Label Group]
Global labels are used for connection to RCPUs or motion CPUs (MELSEC iQ-R Series) only. By using global labels, you can create the project data without paying attention to the actual devices. To use global labels of GX Works3 and MT Developer2, import them to GT Designer3.
Global labels for RCPUs (GX Works3) are useful since they can be imported from the project data at a time.
Global labels for motion CPUs (MT Developer2) are imported from CSV files.
- * Not supported by GT21 and GS21.
[NEW]
Global labels and structure data can be checked with preview before importing.
[NEW]
In addition to CSV files, GX Works3 project data can be specified to import global labels.
Notifying change of global labels [NEW]
Check if there is a change in the GX Works3 project or CSV file specified when global labels are imported with the following methods.
Procedure: [Project] → [Import Other Data] → [Global Label]
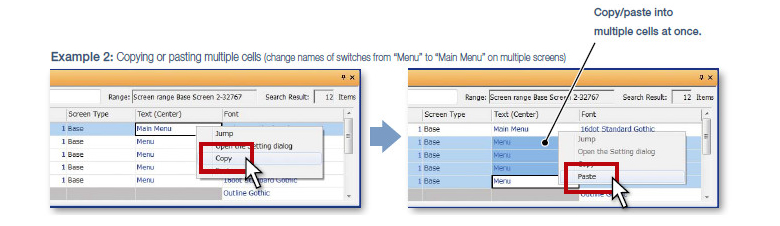
Data browser
The data browser shows a list of objects used in the project. The settings can be edited directly on the browser or by opening the setting dialog. You can easily identify any duplicate data and no longer have to open multiple screens.
●Display targets
Figures, objects, screen scripts, screen trigger actions
●Editable details
Directly edit devices and text, etc.
Change devices, text, colors, and figures in a batch
Change action settings, fonts, and figures
Change range settings of numerical displays and
other objects
Copy/paste multiple cells
Sort and narrow down items by using devices/keywords
Interchange columns with drag & drop
Procedure: [View] → [Docking Window] → [Data Browser]
Shortcut key: Ctrl + E
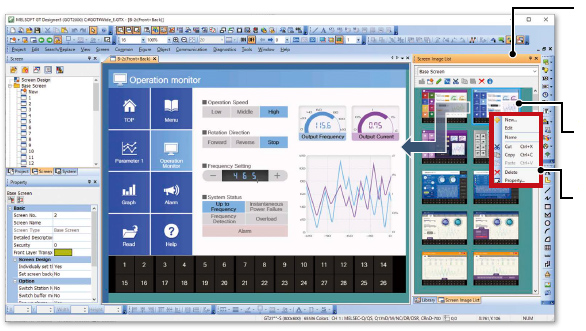
Screen image list (thumbnail display) [Upgraded]
Created screens can be displayed and checked in the screen image list window as thumbnails. By viewing the screen image list, it is easy to look for the screen you need. It is convenient to copy or delete screens on the window.
Greatly improved speed to display screen images [NEW]
- * Settings are required to speed up the display. For the details, please refer to the relevant product manual.
Double-click a screen on the window and display it on the screen editor
Copy or delete the screen on the window
Procedure: [Display] → [Docking Window] → [Screen Image List]
Alarm display (user/system) [Upgraded]
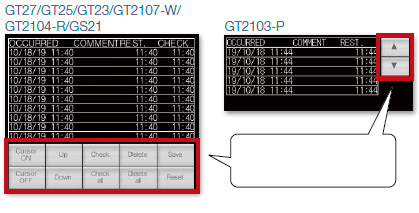
Operation switches are arranged at the same time
The alarm display lists the collected user alarms or system alarms*1. When placing an alarm display, operation switches are arranged at the same time. There is no need to select operation switches for the alarm display separately, thus reducing time for screen design.
- *1 GT21 and GS21 do not support the system alarm function.
Procedure: [Object] → [Alarm Display] → [Alarm Display (User)/Alarm Display (System)]
Device search [NEW]
Search the current project for devices, labels, or tags. By quickly checking the device use status, you can identify which functions use the found devices, and change the related settings. Keyword search narrows down the search results.
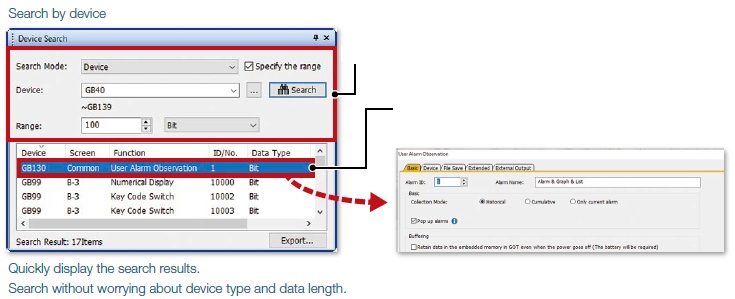
Set details of search conditions
Double-click to jump to the device setting
(jump to Common Settings is also possible)
![Search all devices when the [Device] field is empty/Search by keyword is also available](images/Device-search-2.jpg)
Procedure: [Search/Replace] → [Device Search]
Shortcut key: Ctrl + F
Reflecting [Comment Group No.], [Comment No.], [Part No.] to objects [NEW]
![Reflecting [Comment Group No.], [Comment No.], [Part No.] to objects](images/Objects-1.jpg)
Display the confirmation message whether to reflect the change.
(Settings are made in the [Option] dialog)
Reflect the change to the object where the comment is used.
When changing comment group No., comment No., or part No., the number being set to objects are changed accordingly.
In the [Option] dialog, select whether or not to reflect the change to the object settings when changing the numbers.
Template
Customize each template to the desired look-and-feel, ranging from color options to device selection. Attributes such as devices and colors can be set for each template.
You can easily change devices and colors by associating each object with the template's attribute.
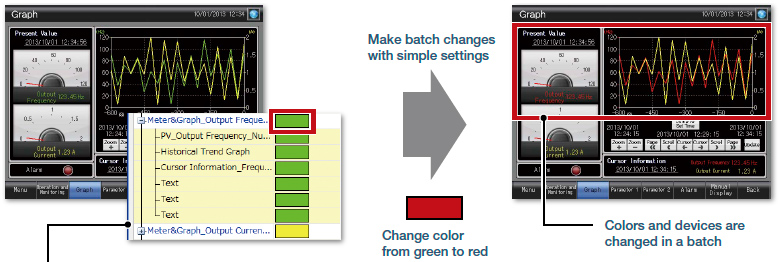
Template attributes (color)
- ● Historical trend graph line color
- ● Text color
- ● Numerical display value color
- ● Items that can be registered in templates
Figures, Objects - ● Attributes that can be registered and changed in templates
Device (Bit, Word), Numerical value, Text, Color, Figure, Font, Text size
- • Selecting from library
Procedure: [View] → [Docking Window] → [Library List (Template)]
Shortcut key: Alt + F9 - • Creating template
Procedure: Select object → Right-click → [Template Registration] → [Register to Template]
e-Manual
e-Manual is the Mitsubishi Electric FA Electrical Document Manual with a dedicated viewer (e-Manual Viewer). Useful functions are included such as keyword search of multiple manuals, saving your favorites, saving memos, and others.
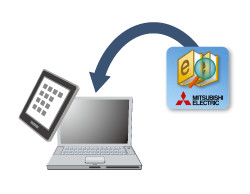
- ➊ Install e-Manual Viewer
- ➋ Always download the latest manuals. Easy to update with just one click!

- ➌ Increase your screen design efficiently
Quickly confirm with F1 key
Press the F1 key in GT Works3 and jump to
e-Manual for the dialog being edited! Quickly
check setting methods and other information!
Easy to view, easy to use!
Easy to view contents, easy to use, useful
functions help you access manuals efficiently.
Quickly search for the information you need.
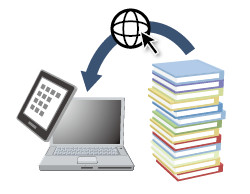
Cross Manual Search
Search required information from multiple manuals by keyword. You can get to the information you need without opening manuals one by one.
Bookmark
Bookmark frequently used manuals and pages and you can check the information quickly.
Note
Take a memo, such as know-how, and add it to the manual and you can customize manuals as you like.
Procedure: [Help] → [GT Designer3 Help]
Shortcut key: F1
* For the details, please contact your local sales office.
< GOT manuals available in e-Manual >
● Manual name
GOT2000 Series User´s Manual (Hardware),
GOT2000 Series User´s Manual (Utility),
GOT2000 Series User´s Manual (Monitor),
GT Designer3 (GOT2000) Screen Design Manual
< e-Manual Viewer Windows® version >
● Supported OS
Microsoft® Windows® 11, Microsoft® Windows® 10
● How to obtain e-Manual
e-Manual is included in GT Works3 Ver.1.155M or later.
For the details, please contact your local sales office.
< e-Manual Viewer tablet version >
Notice of the discontinuation of the application distribution
The distribution and update service of e-Manual Viewer application for the tablet (Android™ and iOS) version on Google Play and App Store ended at the end of March 2024.
The application you are currently using will be continuously available even after each store discontinues the distribution.
If you want to use e-Manual Viewer on tablets, please use the tablets whose operating system is Windows®.
Google Play is the trademark of Google LLC.