Products
FR-E800 Series
Support
 Installation and wiring
 Videos [In preparation]
 Basic operation
 Outline dimension drawing
 Faults
 FAQ
FAQ Inquiries
Manual
-
 FR-E800 GUIDELINE
-
FR-E860 GUIDELINE
-
 FR-E800(-E) Instruction Manual(Connection)
-
FR-E860 Instruction Manual(Connection)
-
 FR-E800(-E) Instruction Manual(Function)
-
 FR-E800(-E) Instruction Manual(Communication)
-
 FR-E800(-E) Instruction Manual(Maintenance)
-
FR-E800(-E) Instruction Manual(Functional Safety)
-
 FR-E800(-E) Options
English
FR-E800(-E) Options
English
-
Quick start guide for FR-E800
Technical News
-
Branch Circuit Protection for FR-E800 drives Acceptable fuses and circuit breakers for FR-E800 drives
Network
-
 FR-E800(-E) Network
English
FR-E800(-E) Network
English
 Installation and wiring
INVERTER INSTALLATION AND PRECAUTIONS
When installing the inverter on the enclosure surface, remove the front cover and wiring cover to fix the inverter.
- Install the inverter on a strong surface securely with screws.
- Leave enough clearances and take cooling measures.
- Avoid places where the inverter is subjected to direct sunlight, high temperature and high humidity.
- Install the inverter on a nonflammable wall surface.
- When tightening screws into the upper mounting holes, tilt the screwdriver seven to ten degrees
(FR-E820-0050(0.75K) or lower, FR-E820S-0030(0.4K) or lower, FR-E810W-0030(0.4K) or lower).

Allow clearance

Removal and reinstallation of covers
Removal of the front cover

Reinstallation of the front cover

Removal of the lower front cover (FR-E820-0240(5.5K) or higher, FR-E840-0230(11K) or higher)

Reinstallation of the lower front cover (FR-E820-0240(5.5K) or higher, FR-E840-0230(11K) or higher)

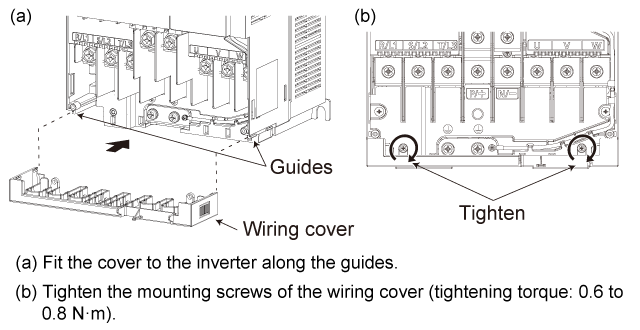
Removal of the wiring cover (FR-E820-0050(0.75K) or lower, FR-E820S-0030(0.4K) or lower, FR-E810W-0030(0.4K) or lower))

Reinstallation of the wiring cover (FR-E820-0050(0.75K) or lower, FR-E820S-0030(0.4K) or lower, FR-E810W-0030(0.4K) or lower))

Removal of the wiring cover (FR-E820-0080(1.5K)) to FR-E820-0175(3.7K), FR-E840-0016(0.4K) to FR-E840-0095(3.7K), FR-E820S-0050(0.75K) or higher, FR-E810W-0050(0.75K))

Reinstallation of the wiring cover (FR-E820-0080(1.5K)) to FR-E820-0175(3.7K), FR-E840-0016(0.4K) to FR-E840-0095(3.7K), FR-E820S-0050(0.75K) or higher, FR-E810W-0050(0.75K))

Removal of the wiring cover (FR-E820-0240(5.5K) to 0600(15K), FR-E840-0230(11K), 0300(15K))

Reinstallation of the wiring cover (FR-E820-0240(5.5K) to 0600(15K), FR-E840-0230(11K), 0300(15K))

Removal of the wiring cover (FR-E840-0120(5.5K), 0170(7.5K))

Reinstallation of the wiring cover (FR-E840-0120(5.5K), 0170(7.5K))

Removal of the wiring cover (FR-E820-0760(18.5K), 0900(22K), FR-E840-0380(18.5K), 0440(22K))

Reinstallation of the wiring cover (FR-E820-0760(18.5K), 0900(22K), FR-E840-0380(18.5K), 0440(22K))
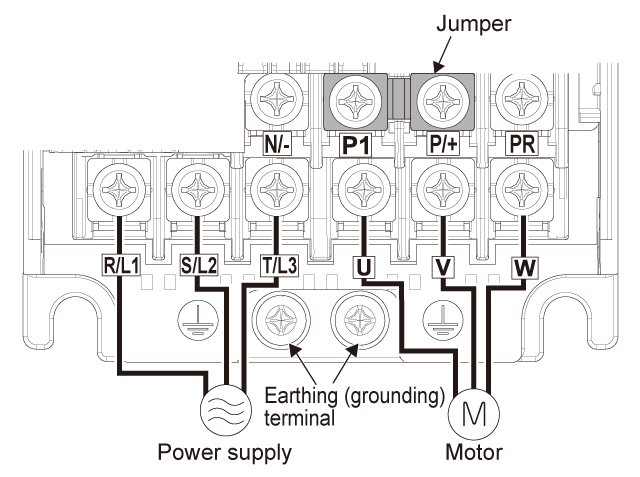
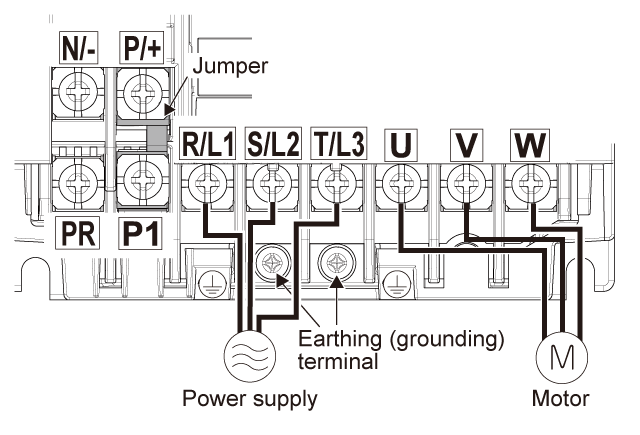
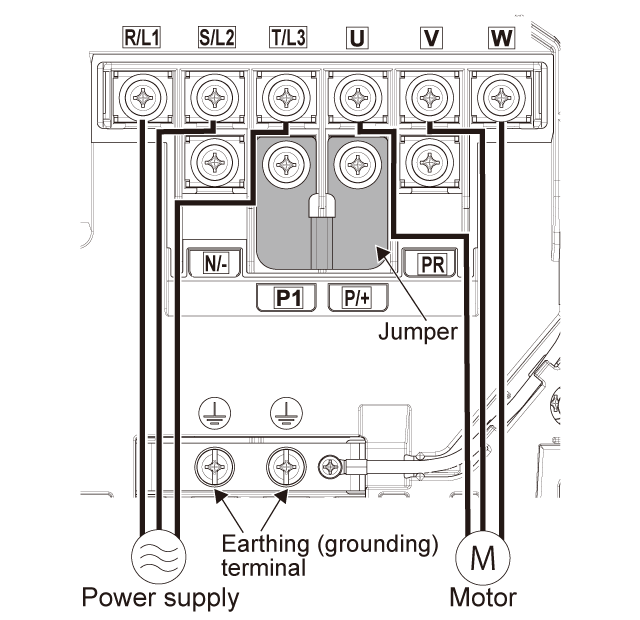
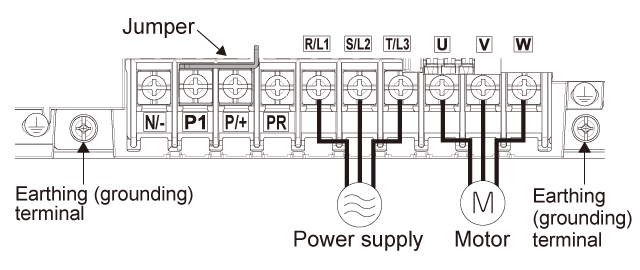
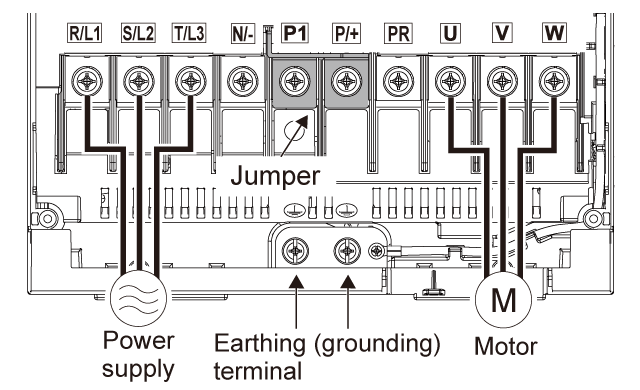
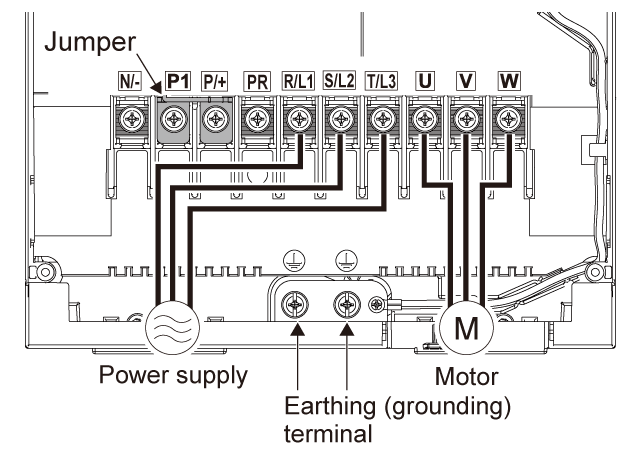
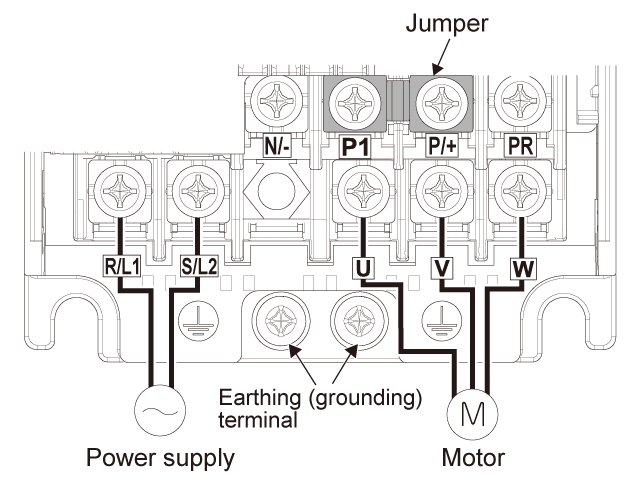
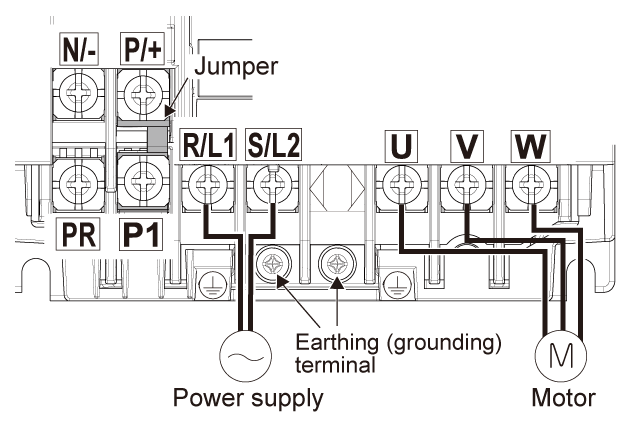
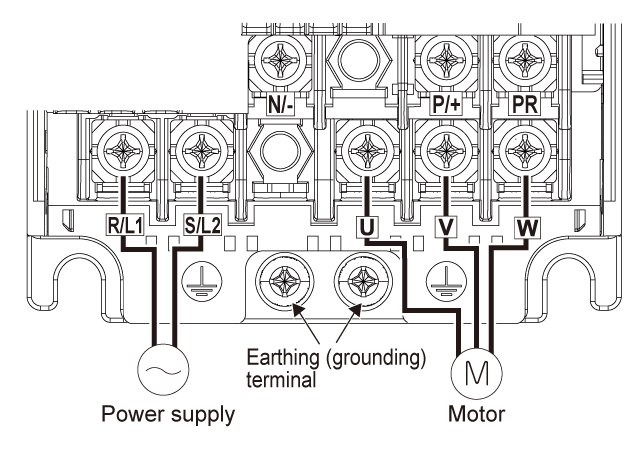
Main circuit terminal layout and wiring to power supply and motor
Three-phase 200/400 V class
FR-E820-0008(0.1K) to 0050(0.75K)
FR-E820-0080(1.5K) to 0175(3.7K)
FR-E840-0016(0.4K) to 0095(3.7K)
FR-E820-0240(5.5K), 0330(7.5K)
FR-E840-0120(5.5K), 0170(7.5K)
FR-E820-0470(11K), 0600(15K)
FR-E840-0230(11K), 0300(15K)
FR-E820-0760(18.5K), 0900(22K), FR-E840-0380(18.5K), 0440(22K)
Single-phase 200 V class / Single-phase 100 V class
FR-E820S-0008(0.1K) to 0030(0.4K)
FR-E820S-0050(0.75K) to 0110(2.2K)
FR-E810W-0008(0.1K) to 0030(0.4K)
FR-E810W-0050(0.75K)
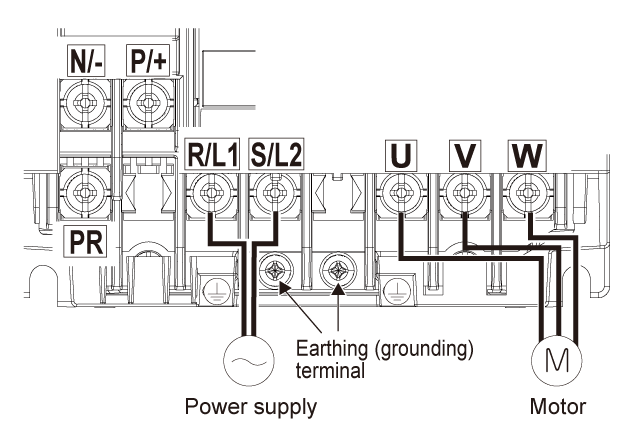
- Make sure the power cables are connected to terminals R/L1, S/L2, and T/L3 (the phases need not be matched). Never connect the power cable to terminals U, V, or W of the inverter. Doing so will damage the inverter.
- Connect the motor to terminals U, V, and W. The motor rotates counterclockwise when viewed from the motor load side when the forward rotation switch (signal) turns ON.
Applicable cables and wiring length
Select cables of recommended gauge size to ensure that the voltage drop will be 2% or less.
If the wiring distance is long between the inverter and motor, the voltage drop in the main circuit will cause the motor torque to decrease especially at a low speed.
The following table shows a selection example for the wiring length of 20 m at the ND rating.
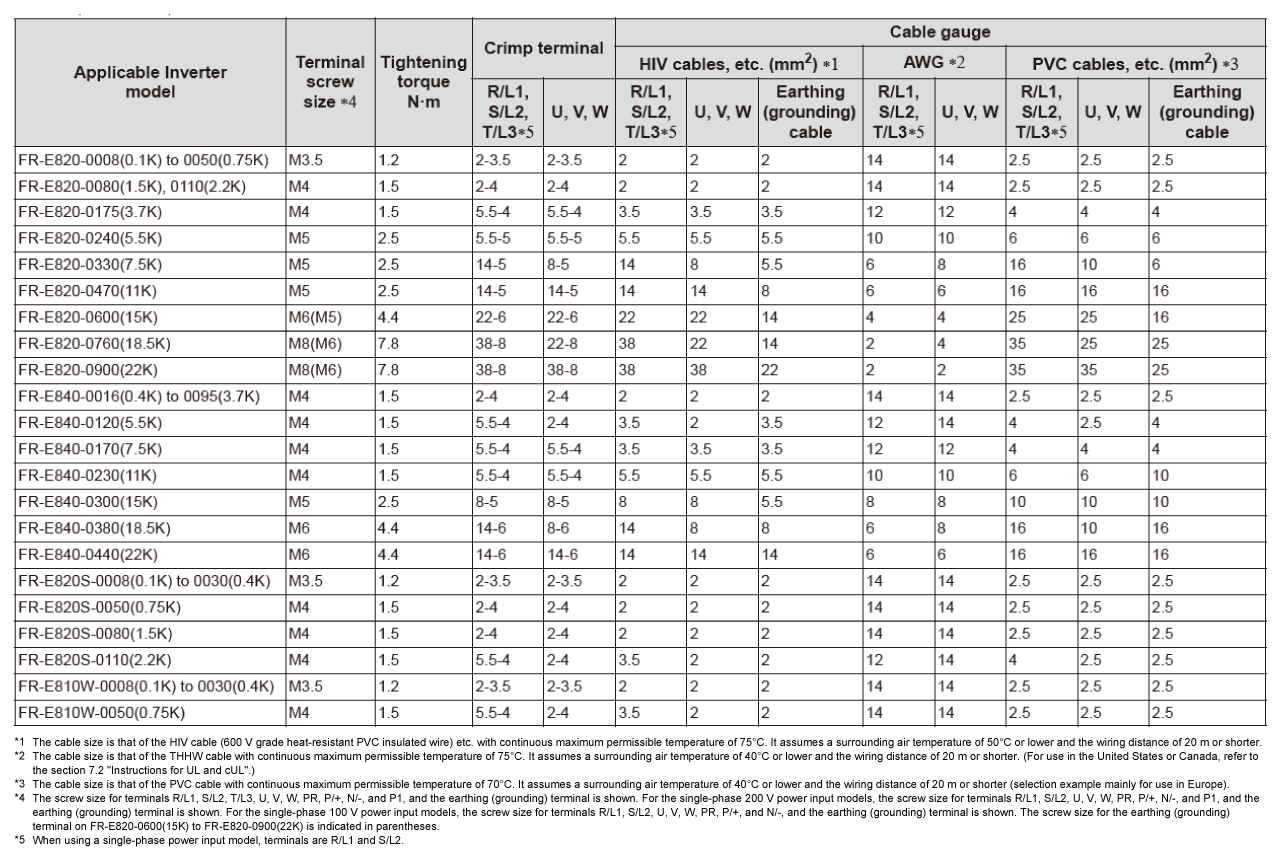
The line voltage drop can be calculated by the following formula:
Line voltage drop [V] = √3 × wire resistance [mΩ/m] × wiring distance [m] × current [A] / 1000
Use a larger diameter cable when the wiring distance is long or when it is desired to decrease the voltage drop (torque reduction) in the low speed range.
Total wiring length
Connect one or more motors within the total wiring length (sum of the wiring lengths of the motor and the inverter) shown in the following table.

When driving a 400 V class motor by the inverter, surge voltages attributable to the wiring constants may occur at the motor terminals, deteriorating the insulation of the motor. In this case, use a "400 V class inverter-driven insulation-enhanced motor" and set Pr.72 PWM frequency selection according to the wiring length: "14.5 kHz or less" when the wiring length is 50 m or shorter, "8 kHz or less" when the wiring length is from 50 m to 100 m, or "2 kHz or less" when the wiring length is longer than 100 m.


